继续学习java后端开发,了解了spring的开发框架后,就需要学习java另外一个重量型的数据库框架。
一、添加依赖 <dependency > <groupId > commons-dbcp</groupId > <artifactId > commons-dbcp</artifactId > <version > 1.4</version > </dependency > <dependency > <groupId > mysql</groupId > <artifactId > mysql-connector-java</artifactId > <version > 8.0.15</version > </dependency > <dependency > <groupId > org.springframework</groupId > <artifactId > spring-jdbc</artifactId > <version > ${spring.version}</version > </dependency > <dependency > <groupId > org.mybatis</groupId > <artifactId > mybatis-spring</artifactId > <version > 1.2.2</version > </dependency > <dependency > <groupId > org.mybatis</groupId > <artifactId > mybatis</artifactId > <version > 3.2.8</version > </dependency >
二、创建对象 UserTo.java
public class UserTo {
    private String name;
    private int age;
    private boolean sex;
    ....
}
三、创建对象控制接口 注意:mybatis要求必须是interface才能映射 @Autowired来自动加载
public interface UserMapper { UserTo getUser (@Param("name") String name) ; void insertUser (@Param("name") String name, @Param("age") int age, @Param("sex") boolean sex) ; void update (@Param("name") String name, @Param("age") int age, @Param("sex") boolean sex, @Param("whereName") String whereName) ; void delete (@Param("name") String whereName) ; }
关于@Param@Param("name") 表示,myBatis的xml或注解可以使用的参数
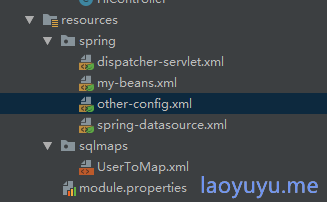
四、编写xml或注解来描述对应方法sql 在resources下创建一个名叫sqlmaps的文件夹(名字随意),用来专门存放mybatis的映射
<?xml version="1.0" encoding="UTF-8" ?> <!DOCTYPE mapper PUBLIC "-//mybatis.org//DTD Mapper 3.0//EN" "http://mybatis.org/dtd/mybatis-3-mapper.dtd" > <mapper namespace ="com.lao.dao.UserMapper" > <resultMap id ="userTo" type ="com.lao.dao.UserTo" > <id column ="USER_NAME" property ="name" /> <id column ="AGE" property ="age" /> <id column ="SEX" property ="sex" /> </resultMap > <select id ="getUser" resultMap ="userTo" > SELECT * FROM USER_TO WHERE USER_NAME = #{name} </select > <insert id ="insertUser" > INSERT INTO USER_TO(USER_NAME, age, sex) VALUES (#{name}, #{age}, #{sex}) </insert > <update id ="update" > UPDATE USER_TO SET USER_NAME=#{name}, age=#{age}, sex=#{sex} WHERE USER_NAME=#{whereName} </update > </mapper >
五、配置mybatis 在resources下创建一个名为spring-datasourcespring的配置文件(名字随意)
<?xml version="1.0" encoding="UTF-8" ?> <beans xmlns ="http://www.springframework.org/schema/beans" xmlns:xsi ="http://www.w3.org/2001/XMLSchema-instance" xmlns:tx ="http://www.springframework.org/schema/tx" xsi:schemaLocation ="http://www.springframework.org/schema/beans http://www.springframework.org/schema/beans/spring-beans.xsd http://www.springframework.org/schema/tx http://www.springframework.org/schema/tx/spring-tx.xsd" > <bean id ="dataSource" class ="org.apache.commons.dbcp.BasicDataSource" destroy-method ="close" > <property name ="driverClassName" value ="${test.driver}" /> <property name ="url" value ="${test.url}" /> <property name ="username" value ="${test.username}" /> <property name ="password" value ="${test.password}" /> <property name ="initialSize" value ="${test.initConnections}" /> <property name ="maxActive" value ="${test.poolSize}" /> <property name ="maxIdle" value ="${test.maxIdle}" /> <property name ="minIdle" value ="${test.minIdle}" /> </bean > <bean id ="transactionManager" class ="org.springframework.jdbc.datasource.DataSourceTransactionManager" > <property name ="dataSource" ref ="dataSource" /> </bean > <tx:annotation-driven transaction-manager ="transactionManager" /> <bean id ="sqlSessionFactory" class ="org.mybatis.spring.SqlSessionFactoryBean" > <property name ="dataSource" ref ="dataSource" /> <property name ="mapperLocations" value ="classpath:sqlmaps/**.xml" /> </bean > <bean class ="org.mybatis.spring.mapper.MapperScannerConfigurer" > <property name ="basePackage" value ="com.lao.dao" /> <property name ="sqlSessionFactoryBeanName" value ="sqlSessionFactory" /> </bean > </beans >
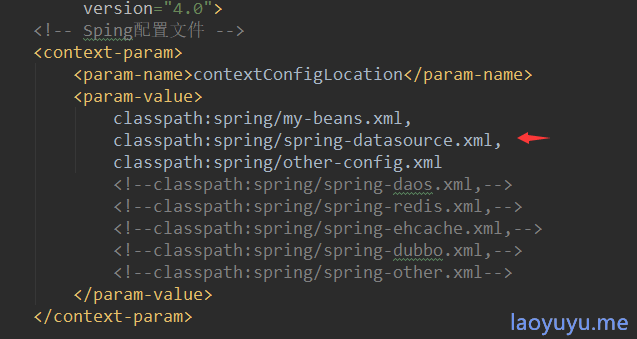
然后在web.xml添加这个配置
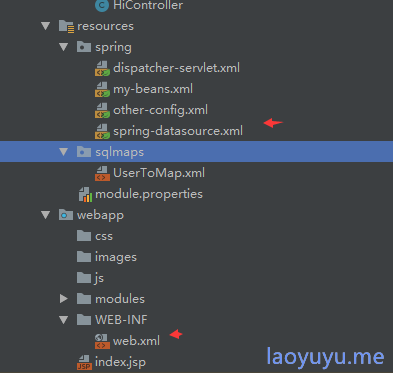
目录结构:
六、使用 一切就绪后,就可以在controller中使用了
@Controller @RequestMapping("/test") public class DbTestController { @Autowired private UserMapper userMapper; @RequestMapping("/get") public ModelAndView getUser () { UserTo u = userMapper.getUser("lao" ); System.out.println(u.getName()); return new ModelAndView ("modules/test/user.jsp" , "user" , u); } @RequestMapping("/insert") public ModelAndView insert () { userMapper.insertUser("dcn" , 30 , false ); return new ModelAndView ("modules/test/user.jsp" , "user" , "success" ); } @RequestMapping("/update") public ModelAndView update () { userMapper.update("laoass" , 100 , false , "lao" ); return new ModelAndView ("modules/test/user.jsp" , "user" , "update success" ); } @RequestMapping("/delete") public ModelAndView delete () { userMapper.delete("laossss" ); return new ModelAndView ("modules/test/user.jsp" , "user" , "delete success" ); } }
注意事项:@Autowired默认是根据类型加载(calss),@Qualifier("UserMapperImp")通过实现类的名称来指定具体的实现类,如:
@Autowired @Qualifier("UserMapperImp") private UserMapper userMapper;
七、常见错误 1、Cannot load JDBC driver class 'com.mysql.jdbc.Driver'
<dependency > <groupId > mysql</groupId > <artifactId > mysql-connector-java</artifactId > <version > 8.0.15</version > </dependency >
2、 Cause: org.springframework.jdbc.CannotGetJdbcConnectionException: Could not get JDBC Connection; nested exception is org.apache.commons.dbcp.SQLNestedException: Cannot create PoolableConnectionFactory (The server time zone value '?????????±?????????±???¤' is unrecognized or represents more than one time zone. You must configure either the server or JDBC driver (via the serverTimezone configuration property) to use a more specifc time zone value if you want to utilize time zone support.)serverTimezone=UTC
参考地址 mybatis 官方中文教程 mybatis-spring 官方中文教程


